 This is the back yard in January of 2000
 |

After planning where the pond will go and the
size, the next step is to make an on scale drawing,
putting your ideas on paper. You can
make changes as you go along so that things fit just "right"
with the lay of the land. As you are
working on the actual pond you may get another idea that you
want to incorporate. In this drawing
you can see 3 ponds that are blue water stream and water falls..
The red is a bridge that goes over the pond. |
|
Drawing of the plumbing. I did not want
any pipes, tubing, and pumps in my pond that would
detract from the pond itself.
Everything is buried underground. The filter
was then later camouflaged so it would not be visit |
 
Above photos shows the underground plumbing going in

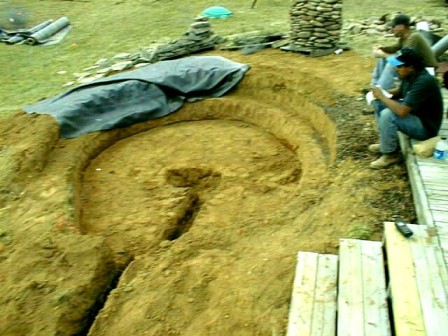
Upper pond dug ready for plumbing
|
 Garden hose was laid out for the design of the
upper pond
The stream bed is ready and
the bridge is placed |
|
Return into the upper pond from the middle pond
and lower pond

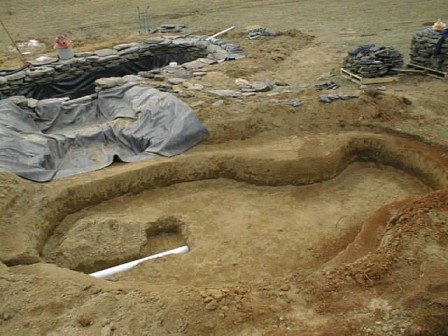 More plumbing
|
 Water falls lading to the lower pond and lower pond
Lower pond is dug bottom drains in place |
 All 3 ponds, the water falls, streambed and
bridge are all in place. Photo was taken from upstairs bedroom window
All 3 ponds, the water falls, streambed and
bridge are all in place. Photo was taken from upstairs bedroom window |
 Bubble Bead filter is hidden behind wooden
structure
Bubble Bead filter is hidden behind wooden
structure
|
 Deck that views middle pond and lower
 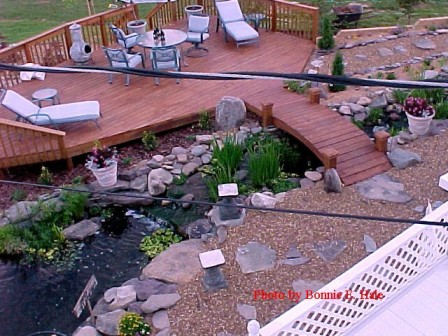 Finished deck viewed from upstairs
 The deck leads to the lower pond. Tropical hibiscus sit on
the deck and winter in the greenhouse.
The deck leads to the lower pond. Tropical hibiscus sit on
the deck and winter in the greenhouse.
|
 |
"Bonnie's plants are extremely lush,
top-size plants at prices that compete with our local budget stores! I have
received another shipment from her, and, as always, it arrived in perfect
condition - the Bonus Plant was an
especially nice touch!"
~ D. Diamond
|
|
|
|
